|
TachoDrive4 Device for data downloading |
Manual
TD4S-IEN002-1402.1.0.0 |
|
|
|
||
|
|
||
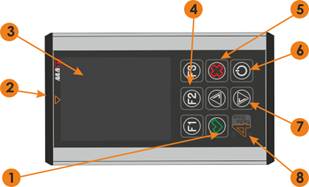
Device description
1. ENTER button
2. Card reader.
3. LCD display.
4. Functional keys.
5. Exit/Cancel key.
6. Turn on/off device.
7. Cursor keys.
8. LED signalizing device operating status..
I. Basic operations
1. Turning the device on
1.1. Press the powering button (6).
1.2. Check the battery status and charge it if necessary
2. Downloading data from tachograph
2.1. Turn the vehicle ignition on.
2.2. Insert the company card to the tachograph.
2.3. Insert the driver card if you want to download the data from card as well.
2.4. Wait a moment until the communication between tachograph and card is established.
2.5. Connect the TachoDrive4 with the tachograph.
2.6. If the Config. screen option is disabled, TachoDrive4 will start downloading the data according to the previously saved configuration. Otherwise the device will display a menu, where the user can choose one of the configurations (the user can define the range as well as the type of downloaded data for every configuration in the 3.1 DL settings menu), where the default settings are as follows:
o DL1: activities from the last 90 days, events and faults;
o DL2: activities since the last download, events and faults;
o DL3: activities since the last download, events and faults using this TD4 device;
2.7 Select a configuration using the F1, F2, F3 buttons.
2.8 The TD4 device will start downloading the data.
2.9 In case of Tachodrive4 Pro C version, in menu 4. Critical E&F one can find a list of all events and faults defined by the Annex 1b of the 1360/2002 Regulation. The user can select those that the TD4 should treated as critical. TachoDrive4 will analyse them for the presence of those selected by the user and display the “Critical faults found. Analyse the data” message.
2.10 The Tacho downloaded successfully. Disconnect Tacho! message will be displayed after the download is completed. Disconnect the TachoDrive4 from the tachograph and remove the company card.
3. Downloading data from driver card
3.1. Turn the device on – button (6).
3.2. Insert the driver card to the card reader (2).
3.3. The download starts automatically
3.4. Card download. Please wait! message will be displayed.
3.5. Finished download will be signalized with a sound effect as well as Card downloaded successfully. Please remove card! message. You should remove the card now.
4. Analysing data from company card
4.1. Turn the device on – key (6).
4.2. Select Files in the Main menu.
4.3. Select from CARD. The list of files downloaded from cards will be displayed.
4.4. Select the file that you want to analyse using the Cursor keys (7).
4.5. Push the F1 button.
Analyse of company card take a few seconds. Results will be displayed on the LCD screen:
- type of activity
- date and time of activity
- other info concerning activity
In the upper right corner you can see number of present activity and the total number of activities registered on the company card.
5. Analysing data from driver card
5.1 Turn the device on – key (6).
5.2 Select Files in the Main menu.
5.3 Select from CARD. The list of files downloaded from cards will be displayed.
5.4 Select the file that you want to analyse using the Cursor keys (7).
5.5 Push the F1 button. The activities from the last 4 weeks saved on the card will be analysed (the analysis mode can be selected in the 3.3 Card analy. mode). After the analysis is done, given below menu will be displayed:
5.5.1 Summary – short report including amount of driver infringements,
5.5.2 Details – detailed report about every driver infringement with the time it occurred. In order to view all infringements you need to use the cursor keys (7) to scroll the screen forward and backward.
5.5.3 Graph – graphical view of all activities from the last 28 days + current day.
5.5.4 Faults* – list of all faults arose during the tachograph exploitation.
Pressing the F1 button one can print the report (optional) via the built-in Bluetooth module or save it by pressing the F2 button (except the Faults report). After pressing one of the above mentioned buttons, one needs to select the report that is to be printed or saved. Reports are being saved in the HTML format in the REPORT folder of the device memory.
6. Analysing data from tachograph
6.1. Turn the device on – key (6).
6.2. Select Files in the Main menu.
6.3. Select from TACHOGRAPH. The list of files downloaded from tachograph will be displayed.
6.4. Select the file that you want to analyse using the Cursor keys (7).
6.5. After pushing F1 button, the list of functions will appear, in which “Speed diagram” as well as other functions are available as an option. Each function analyses different group of data.
7. Transferring files to the PC
7.1 Connect the TachoDrive4 to the USB port of PC.
7.2 The device will be detected as a Mass Memory Device.
7.3 Open My computer window. Find and open the removable disk with the TACHODRIVE4 label:
7.3.1 If you want to see the files form cards – go to the DOWNLOAD\CARD folder,
7.3.2 If you want to see the files from tachographs – go to the DOWNLOAD\TACHO folder.
7.3.3 If you want to see the reports files, go to the DOWNLOAD\REPORTS folder.
8. Overview of text files (UTF-8 coding)
8.1. Turn the device on – key (6).
8.2. In Main menu select Files.
8.3. Choose User. There will appear list of files saved in UTF-3 coding system, in catalogue USER, on TachoDrive4 disc.
8.4. By using cursor key (7) choose file, which you want to see
8.5. By cursor keys (7) you can move one row and by F1 button – change font size.
9. LEDs status in standby mode (approximate indications)
9.1. Flashing green LED (8) – the accumulator does not require charging yet
9.2. Flashing red LED (8) – the accumulator requires charging
* the function available in version TD4 Pro
II. Bluetooth function
The TachoDrive4 can be optionally equipped with the Bluetooth module enabling wireless connection and data transmission with other devices such as PC, mobile phone or palmtop. TachoDrive4 allows to communicate using the Object Push, File Transfer and OBEX FTP Server technology defined in the Bluetooth specification. The first two mentioned technologies are used to send downloaded files directly from the TachoDrive4 to another Bluetooth device while the OBEX FTP Server technology allows to browse the folder structure remotely in a similar way to the Windows Explorer.
WARNING! Not all devices allow to exchange information using all supported in the TachoDrive4 technologies. You need to pair the devices in order to use the Bluetooth module.
1. Pairing Bluetooth devices
1.1. Turn the device on – button (6).
1.2. In the Main menu go to the Settings ->System Config. -> Bluetooth -> Paired devices. All paired devices will be listed.
1.3. If the device you want to connect to is not on the list, push the F1 (+) (5) button. TachoDrive4 will search for all Bluetooth devices in the area or F3 (-) to remove paired device.
1.4. Select the device that you want to add to the paired devices form the list and push the Enter (8) button.
1.5. If the target device ask for PIN, type 1234**.
1.6. Pairing devices has been completed.
2. Sending files from TachoDrive4
2.1. Turn the TachoDrive4 on – button (6).
2.2. Select Files in the Main menu and then,
· from CARD if you want to send file of the download driver’s card,
· from TACHO if you want to send file of the downloaded tachograph.
· USER – if you want to send another file from the device memory.
2.3 Select the file using the cursor keys (7),
2.4 Push the F2 button and select Object Push or File Transfer depending on the technology supported in the target device.
2.5 Select the target device or search Bluetooth devices by selecting Search (F1 button).
2.6 If the target device asks for PIN, type 1234**.
2.7 Selected file will be sent to the target device.
3. Browsing the TachoDrive4 files structure from a different device
3.1. Turn the device on – button (6)
3.2. Select Files -> from CARD in the Main menu.
3.3. Select any file and push the F2 button (4).
3.4. Select File Server in the Transfer mode menu. The OBEX FTP server EXIT – X message will be displayed which means that the TachoDrive4 operates in the mode allowing to browse its files structure.
3.5. Run the software on the second device (such as laptop) compliant with File Transfer Profile allowing to communicate wireless (such as BlueSoleil) and connect with TachoDrvie4.
3.6. If the device asks for the PIN, type 1234.
3.7. All files located on the TachoDrive4 will be visible in the software window. It is possible to move, delete or copy them between the devices,.
3.8. After work is done, close the application and push the Exit (5) button in order to finish working in the server mode.
4. Printing reports
TachoDrive4 allows printing reports on printers equipped with Bluetooth module using the XHTML-Print language(such as HP DJ460wbt). Before printing, one should do the following: 1) install the printer drivers on PC. 2) Connect the printer. 3) Set the same PIN in the printer as in the TD4 device*. Printing some of the reports is dependent on the TachoDrive4 firmware version. In order to print the driver infringement report, do the following:
4.1. Turn the device on – key (6).
4.2. Make the driver card analysis (see Basic operations, point 4)
4.3. Select the Print report option in the Card analysis menu and press the Enter (8) button.
4.4. Select the type of printout you want to print:
4.4.1. Infringements report
4.4.2. Summary report
4.4.3. Activities report
4.5. Searching for the Bluetooth printers will be made.
4.6. Select the printer that you want to print the report on from the list of detected devices and press the Enter (8) button. You can also search for more printers by pressing the F1 button.
After the successful data transmission to the printer, the Data has been sent message will be displayed on the screen. Push the Enter (1) button to go back to the Card analysis menu
Device MENU
1. Fleet
1.1. Drivers
1.2. Vehicles
2. Files
2.1. from CARD
2.2. from TACHO
2.3. REPORTs
2.4. USER
3. Settings
3.1. DL settings.
3.2. Analyse param.
3.3. Card analy. mode
3.4. Critical E&F
3.5. System config.
4. Other
4.1. System info
4.2. Service
4.3. Unlock code
4.4. Restore settings
Troubleshooting
· You will find basic troubleshooting steps in our FAQ section of the www.tachodrive.com webpage.
· In case of more complex situations, enable the Extended log option (check the Generated extended LOG file box in key configuration window). The log file will be saved in the key memory with next download. Send it to distributor for analysis. NOTE: the Extended log function increases the key memory usage.
Charging accumulator
The accumulator can be charged in two ways:
· by connecting the device to the USB port of the PC
· by the external charger.
WARNING!
1. Please charge the accumulator before using.
2. The USB current efficiency of some PC is not compliant with the standard which may cause problems with proper device operating in the Mass memory mode.
Additional information
![]() Do not bin
the used device! Used devices need to be utilized in the local electric and
electronic waste collecting_point.
Do not bin
the used device! Used devices need to be utilized in the local electric and
electronic waste collecting_point.
* The default PIN for theDJ460 and DJ470 printers is: 0000
** The default PIN for the TachoDrive4 device is: 1234.
You can change PIN in Settings menu